3.16.2009

Supervillain Costume - Cover a corset


In an effort to get a little more mileage out of a former Halloween costume, I decided to reuse some of the parts for an upcoming costume party. I am going to be a water-themed supervillain (since those are more fun anyway) and dig out all the spare parts left over from my awesome mermaid costume (pictured at left) from a few years previous (I actually wore the thing twice, although with a new and improved tail the second time). Being the packrat/costume designer that I am, I've always had difficulty tossing out old costumes, especially the awesome ones. I still have all the pieces, including the wig and scraps of fabric I didn't even end up using for the tail. Additionally, I have a whole pile of ocean-y colors of fabric, such as blue, purple, and green. Slap on some sequins, and we're good to go.

I'm starting with a corset purchased specially for this new costume (as we all know, the primary purpose of a comic book villainess is to be a busty, waspy-waisted sexual foil), although I decided the designs on it, while pretty, were just too busy for a good comic book supervillain. A comic book costume (at least the American variety) is usually composed of blocks or strips of color, instead of a richer brocade. I mean, the former is easier to draw, after all.
A corset cover really needs to fit the contours of the corset if it's going to look good. Just covering it in a tube of stretchy fabric will look wrinkly and hasty. And dumb. So here's how I made my tailored cover (click on any image to see a larger version):

First, I had to replicate each section of the corset I was going to cover (I decided to cover just the front 2/3, since I'll have a cape). To replicated a corset section, lay it down on paper, tacking the first section completely flat. If there are wrinkles when you tack it down, the paper pattern will be warped and inaccurate.

If you don't have a corkboard table to tack your corset to, you can lay everything on a carpeted floor or couch cushion. This technique really works best if you can push the pin or tack all the way in, so your fabric sections can't move around.

Once a section is tacked down securely, take a tack or pin (a pin is recommended if your fabric is prone to snagging) and punch holes along the perimeter of the garment section. (The perimeter will be wherever there is a seam or a hem). You can space these out as much as you like, but be sure to punch a hole at each corner and along the edge of curves.

When you remove the fabric, you will have your pattern piece punched into the paper. Trace over this line. If you want a seam allowance, you will need to add it.

Clearly mark all of your pattern pieces, including things like seam allowance (1/4" SA, for example), the top and bottom of each piece, and what order the pieces are sewn together in. With a garment as complex as a corset, this last detail is extremely important! You can do something as simple as labeling pieces 1, 2, 3, etc. Now you are ready to cut out your pieces!

I recommend using 1-way stretch fabric, and laying it out so it stretches up and down!
This will make your life much easier when it comes time to attach it all to the corset!


Here are all the fabric pieces laid out, next to the corset for comparison. You may want to do this with your own pieces to remind yourself how they all fit together while you are assembling them.

You may notice that the center section is a single piece of fabric instead of two. I did this to cover the busk - the center section will be sewn on one side to the cover, and attach on the other side with Velcro (see below.)


Pictured above, all the pieces are sewn together and laid out as they will be attached to the corset. The center section is unattached on one side (the velcro closure has not yet been added).

To attach the cover to the corset, I used a simple running stitch along the outer perimeter of the entire cover. A running stitch is quick and it can be easily removed. The cover is sewn along the top, bottom and outer sides, except for the center piece. I also attached some sequins along the top. Here is a photo with the front section left open to see how the cover was attached more clearly:


2.13.2009

How to be a SUPERHERO! (or a villian...)

In honor of one of the greatest comic books ever written being turned into a film this spring, I thought I'd return to my costuming roots of yore.

How does one become a superhero?
First, you have to develop a character, and then create a fantastic look.
Naturally, you can always be an established super hero, such as Wonder Woman or Superman. These are pretty easy to pull off, so long as you don't mind a lot of spandex. There are, however, a handful of super heroes and villians that actually wear normal clothes, such as Rorschach or Wonder Girl.
1980's Supergirl (right) and Contemporary Supergirl (left)


American vs. International Superheroes
Generally speaking, American superheroes tend to follow a tried and true formula: SPANDEX. ... and usually bright colors, unless you're going for a more contemporary, film-loosely-based-on-comic book look, as in the more recent X-Men movies.
The latter, however, would probably involve a lot more molded plastic.
Additionally, female characters tend to have low-cut necklines and (generally) bare or tightly wrapped thighs. Men, by contrast, have their entire body covered and wear boots, more often than not.

Note the tight spandex and difference in clothing style between men and women.

Shaktimaan (India) wears a more "futuristic" costume.
With international superheroes, the field is a little broader. Costumes range from traditional folk clothing to a crazy, 1950's era "future look" (think Ultraman). Despite the wider range of options (and the fact that these characters tend to wear less revealing outfits), there are some drawbacks. Namely, few people will know who you are portraying. Also, straying to far from the traditional unitard/bathing suit look might make you a less convincing SUPERHERO/VILLIAN.

More Information on International Superheroes

Captain Canuck (Canada)

Ultraman family (Japan)
Costume How-to
Now that you've decided on who you will portray, you need to build a costume. Generally, your persona will have one or more of the following boots, a utility belt, cape, and bizarre makeup. For guidance on quick and easy ways to create all these goodies, please refer to the links provided.

Boot covers

Mel's Boot Cover Tutorial (if you have boots to cover)Boot Covers by Love Meeko (You can use any shoes for this one. On the menu, click "Tutorials" and scroll down to "Boot Covers")
Capes
Circle capeSquare cape

Etc.
Utility belt pouches by Kazumi KurosakiScary Makeup by Martha Stewart (or one of her minions...)

Additional tips...
How to Make a Super Hero Costume by indymogul


1.27.2009

Gung Hay Fat Choy!

After a ton of sewing and much rehearsal, our lion dancing troupe performed for the Lunar New Year at a local elementary school. Here's a clip from the dance below (I'm the head!)


They're hard to see, but the leg pieces and foot covers were all sewn by yours truly. I'll post a little how-to, with more detailed photos in a bit.

1.17.2009

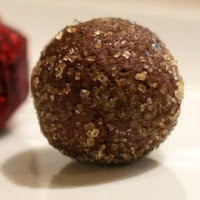
Truffles!

Special thanks to Sara for the lovely photos!

Well, I have finally made some truffles. Quite a while ago, actually, but I haven't found time to post anything about them yet.

This was quite an ordeal. I worked from a trio of recipes off of the Sunset Magazine website, although I can no longer locate the recipes. The basic recipes I followed can be found below.

The most important thing to remember when making truffles is proportions! If you use too much cream or other liquids (such as liquor for flavor), the truffles will turn into runny fudge or frosting, at best. Fantastic, tasty frosting, but that's probably not what you want. More about that in the "trouble-shooting" section.


Basic Recipe for Truffles, adapted from Sunset Magazine:
Makes about 2 dozen 1-inch truffles of each variety
Ingredients for espresso truffles:
* 3/4 cup whipping cream
* 1 tablespoon instant espresso powder
* 12 ounces bittersweet or semisweet chocolate, finely chopped
* 1 tablespoon Kahlua
* About 1/4 cup unsweetened cocoa


Ingredients for raspberry truffles
* 1/2 cup whipping cream
* 12 ounces bittersweet or semisweet chocolate, finely chopped
* 1 tablespoon framboise or other raspberry liqueur
* 1/4 cup raspberry jam, melted and strained
* About 1/4 cup unsweetened cocoa


Ingredients for ginger truffles
* 3/4 cup whipping cream
* 12 ounces bittersweet or semisweet chocolate, finely chopped
* 1 tablespoon rum
* 1/4 cup minced candied ginger
* About 1/4 cup unsweetened cocoa

Preparation

1. In a 1- to 2-quart pan over high heat (for espresso truffles, add espresso powder and stir until dissolved in cream), bring cream to a boil. Meanwhile, place chopped chocolate in a bowl. Pour cream over chocolate and stir gently with a flexible spatula until chocolate is melted and mixture is smooth. (If chocolate does not melt completely, place bowl over a pan of barely simmering water and stir until melted and smooth.) Stir in other ingredients. Chill mixture until firm, at least 3 hours; if desired, cover and chill up to 1 week.

2. Line a 12- by 15-inch baking sheet with a piece of waxed paper. With a spoon, scoop out 1-tablespoon portions of chocolate mixture; place on waxed paper. If mixture is too firm to scoop, let stand at room temperature about 10 minutes.

3. Place 1/4 cup cocoa on a rimmed plate. Dust hands lightly with cocoa. With your hands, roll each scoop of chocolate mixture into a ball, then roll in cocoa to coat. Place each truffle in a small paper candy cup (see notes). To store, place truffles between layers of waxed paper in an airtight container and chill.

These truffles will last quite a while, but they are best when you eat them within a week or so.

Trouble-shooting:
Need more flavor?
I found that these recipes weren't nearly as flavorful as I was hoping for. If you find this to be true of your truffles, you can always add more flavoring. However, unless your flavoring is super-concentrated, more of or additional ingredients other than that mentioned in the recipe will really mess with your truffles. Too much liquid will make them like fudge, and not enough will make them too hard.

What if my truffles are too soft or too hard?
Truffles are more or less solid because of the liquid (cream, flavoring) to solid (melted and then resolidified cocoa). If you want to augment a truffle recipe - add more flavoring, for example - it helps to have a little extra chocolate on hand. When the chocolate is still hot (not too hot to the touch, but warmer than room temperature), it should have the consistency of thick frosting.

Remelt the mixture
ALWAYS USE A DOUBLE BOILER WHEN MELTING CHOCOLATE!!! You can make a simple double-boiler by placing your mixture (still in its bowl - glass or ceramic are best)
If your truffle mixture is too hard, let it sit out for a little while before rolling it into balls. If that doesn't work, you can always remelt your mixture just enough to add a small amount of cream or other liquid. Quickly stir it in, and you'll probably be able to tell if you need to add more or not.

If your truffle mixture turns out too soft, you can remelt it and add a little more melted chocolate.

1.06.2009

Modified Stuffed Bunny

Now, before you all think I'm totally insane, I want you to know that a friend commissioned me to make this little guy. I like the results, but I in no way endorse hurting actual fuzzy bunnies. Or unfuzzy ones. Or any critters (or people) for that matter.

So, I started with a cute little beanie bunny my friend gave me.
He asked me to make it look like the bunny's head had been taken off, and it was all gory inside. I wanted to make it look somewhat anatomically correct, so there is a spinal column, esophagus, and trachea, along with muscles.
hThe toughest part was finding the stitching along the neck, since the material was so thick and fuzzy. I removed all the stitching, aside from that on the back part of the toy, so it had a sort of "flip-top" head.

I made a tight tube with burgundy upholstery fabric, and wrapped in off-white felt to make a spinal cord with marrow. Then, I made a brown felt trachea and a pink felt esophagus. I finished the latter two tubes with a whip stitch in red thread.

For the muscles, I stitched the three tubes together, and then I stitched red felt to the tubes. I gathered and folded the red felt into a circle around the tubes, to fit in the neck holes. I stitched the folds in place with red thread.
After making two of these muscles-and-tube pieces, I inserted them into the bunny, stitching them in place with white thread.

Sorry I don't have any procedural photos, but let me know if you have any questions.

I am thinking about selling some custom ones, but they are a little creepy to make, so maybe not.

Thanks for checking out my post.