

In an effort to get a little more mileage out of a former Halloween costume, I decided to reuse some of the parts for an upcoming costume party. I am going to be a water-themed supervillain (since those are more fun anyway) and dig out all the spare parts left over from my awesome mermaid costume (pictured at left) from a few years previous (I actually wore the thing twice, although with a new and improved tail the second time). Being the packrat/costume designer that I am, I've always had difficulty tossing out old costumes, especially the awesome ones. I still have all the pieces, including the wig and scraps of fabric I didn't even end up using for the tail. Additionally, I have a whole pile of ocean-y colors of fabric, such as blue, purple, and green. Slap on some sequins, and we're good to go.
I'm starting with a corset purchased specially for this new costume (as we all know, the primary purpose of a comic book villainess is to be a busty, waspy-waisted sexual foil), although I decided the designs on it, while pretty, were just too busy for a good comic book supervillain. A comic book costume (at least the American variety) is usually composed of blocks or strips of color, instead of a richer brocade. I mean, the former is easier to draw, after all. parts for an upcoming costume party. I am going to be a water-themed supervillain (since those are more fun anyway) and dig out all the spare parts left over from my awesome mermaid costume (pictured at left) from a few years previous (I actually wore the thing twice, although with a new and improved tail the second time). Being the packrat/costume designer that I am, I've always had difficulty tossing out old costumes, especially the awesome ones. I still have all the pieces, including the wig and scraps of fabric I didn't even end up using for the tail. Additionally, I have a whole pile of ocean-y colors of fabric, such as blue, purple, and green. Slap on some sequins, and we're good to go.
A corset cover really needs to fit the contours of the corset if it's going to look good. Just covering it in a tube of stretchy fabric will look wrinkly and hasty. And dumb. So here's how I made my tailored cover (click on any image to see a larger version):
 First, I had to replicate each section of the corset I was going to cover (I decided to cover just the front 2/3, since I'll have a cape). To replicated a corset section, lay it down on paper, tacking the first section completely flat. If there are wrinkles when you tack it down, the paper pattern will be warped and inaccurate.
If you don't have a corkboard table to tack your corset to, you can lay everything on a carpeted floor or couch cushion. This technique really works best if you can push the pin or tack all the way in, so your fabric sections can't move around.
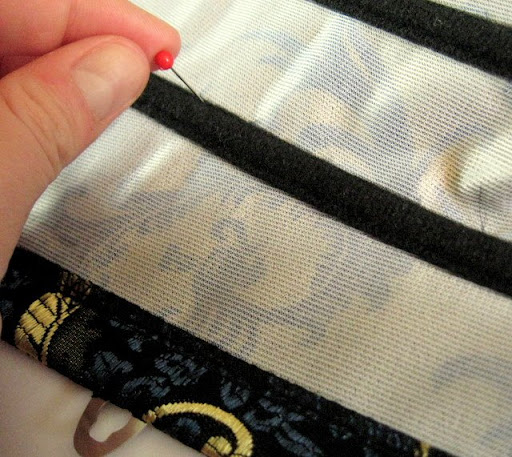 Once a section is tacked down securely, take a tack or pin (a pin is recommended if your fabric is prone to snagging) and punch holes along the perimeter of the garment section. (The perimeter will be wherever there is a seam or a hem). You can space these out as much as you like, but be sure to punch a hole at each corner and along the edge of curves.
 When you remove the fabric, you will have your pattern piece punched into the paper. Trace over this line. If you want a seam allowance, you will need to add it.
 Clearly mark all of your pattern pieces, including things like seam allowance (1/4" SA, for example), the top and bottom of each piece, and what order the pieces are sewn together in. With a garment as complex as a corset, this last detail is extremely important! You can do something as simple as labeling pieces 1, 2, 3, etc. Now you are ready to cut out your pieces!
 I recommend using 1-way stretch fabric, and laying it out so it stretches up and down! This will make your life much easier when it comes time to attach it all to the corset!
 Here are all the fabric pieces laid out, next to the corset for comparison. You may want to do this with your own pieces to remind yourself how they all fit together while you are assembling them.
You may notice that the center section is a single piece of fabric instead of two. I did this to cover the busk - the center section will be sewn on one side to the cover, and attach on the other side with Velcro (see below.)
 Pictured above, all the pieces are sewn together and laid out as they will be attached to the corset. The center section is unattached on one side (the velcro closure has not yet been added).
To attach the cover to the corset, I used a simple running stitch along the outer perimeter of the entire cover. A running stitch is quick and it can be easily removed. The cover is sewn along the top, bottom and outer sides, except for the center piece. I also attached some sequins along the top. Here is a photo with the front section left open to see how the cover was attached more clearly:

